Mini Pumpkin Pies Recipe
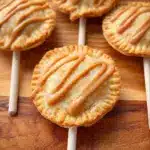
These Mini Pumpkin Pies are adorable, delicious, and perfect for fall gatherings. Using deep dish frozen pie crusts shaped into pumpkins, they are filled with a sweet, spiced pumpkin mixture and baked to golden perfection. Finished with a maple glaze drizzle, these bite-sized treats combine classic autumn flavors with a fun presentation that everyone will love.
- Prep Time: 20 minutes
- Cook Time: 23 minutes
- Total Time: 43 minutes
- Yield: 12 mini pumpkin pies 1x
- Category: Dessert
- Method: Baking
- Cuisine: American
- Diet: Vegetarian
Ingredients
Scale
Pie Crust
- 2 Deep Dish Frozen Pie Crusts (9 inch)
Pumpkin Filling
- 1/2 cup Pumpkin Puree
- 1/4 cup Brown Sugar
- 1 Tablespoon Maple Syrup
- 1/4 teaspoon Pumpkin Pie Spice
- 1 Egg (beaten, divided)
Additional
- 6 ” Lollipop Sticks (optional)
Glaze
- 1/2 cup Icing Sugar
- 1/2 teaspoon Vanilla Extract
- 2 to 4 Tablespoons Maple Syrup
Instructions
- Defrost pie crusts: Remove the frozen pie crusts from the freezer and allow them to defrost on the counter for about one hour until pliable.
- Prepare pie crust shapes: Remove the pie crusts from their tins and roll them flat with a rolling pin. Using a pumpkin-shaped cookie cutter, cut out pumpkin shapes from the dough.
- Preheat oven: Preheat your oven to 350°F (175°C) to prepare for baking the pies.
- Mix pumpkin filling: In a small bowl, combine pumpkin puree, brown sugar, maple syrup, and pumpkin pie spice. Stir well until evenly mixed.
- Assemble bottom crusts and brush with egg: Arrange half of the pumpkin dough shapes on a parchment-lined baking sheet. Brush each with a thin layer of beaten egg to help seal the pies later.
- Add lollipop sticks: Gently press the lollipop sticks into the bottom pumpkin shapes, inserting at least one inch into the dough so they are secure.
- Add pumpkin filling: Spoon a small amount of the pumpkin mixture onto the center of each bottom pumpkin shape over the lollipop stick, leaving about half an inch border for sealing.
- Top and seal pies: Place the remaining pumpkin shapes on top of the filled bottom pieces. Press edges together gently with your fingers, then firmly crimp with a fork to seal completely.
- Brush tops with egg: Lightly brush the tops of the sealed mini pumpkin pies with the remaining beaten egg to promote browning.
- Bake: Bake the pies in the preheated oven for 20 to 25 minutes, or until golden brown and cooked through. (Typically done around 23 minutes).
- Prepare glaze: While pies bake, mix icing sugar and vanilla extract in a small bowl. Gradually add maple syrup, one tablespoon at a time, stirring until the glaze has a slightly runny consistency.
- Decorate pies: Transfer the glaze to a zip lock bag, seal it, and snip off a small corner. Drizzle the glaze over the cooled mini pumpkin pies for a sweet finishing touch.
Notes
- Allow pie crusts to defrost properly to avoid cracking when rolling and cutting shapes.
- Lollipop sticks are optional but make these mini pies fun to serve like pumpkin pie pops.
- You can adjust the pumpkin pie spice or sugar levels according to your taste preferences.
- Use parchment paper or a silicone baking mat to prevent sticking during baking and make cleanup easier.
- Let pies cool slightly before glazing to prevent melting the icing sugar glaze.
- Store leftovers covered at room temperature for up to 2 days, or refrigerate for up to 4 days.
Nutrition
- Serving Size: 1 mini pumpkin pie
- Calories: 150
- Sugar: 10g
- Sodium: 120mg
- Fat: 7g
- Saturated Fat: 3g
- Unsaturated Fat: 3.5g
- Trans Fat: 0g
- Carbohydrates: 20g
- Fiber: 2g
- Protein: 2g
- Cholesterol: 40mg
Keywords: mini pumpkin pies, pumpkin pie pops, fall dessert, pumpkin puree dessert, bite-sized pies, Halloween dessert
Find it online: https://cookedbycleo.com/mini-pumpkin-pies-recipe/