Cherry Hand Pies Recipe
Introduction
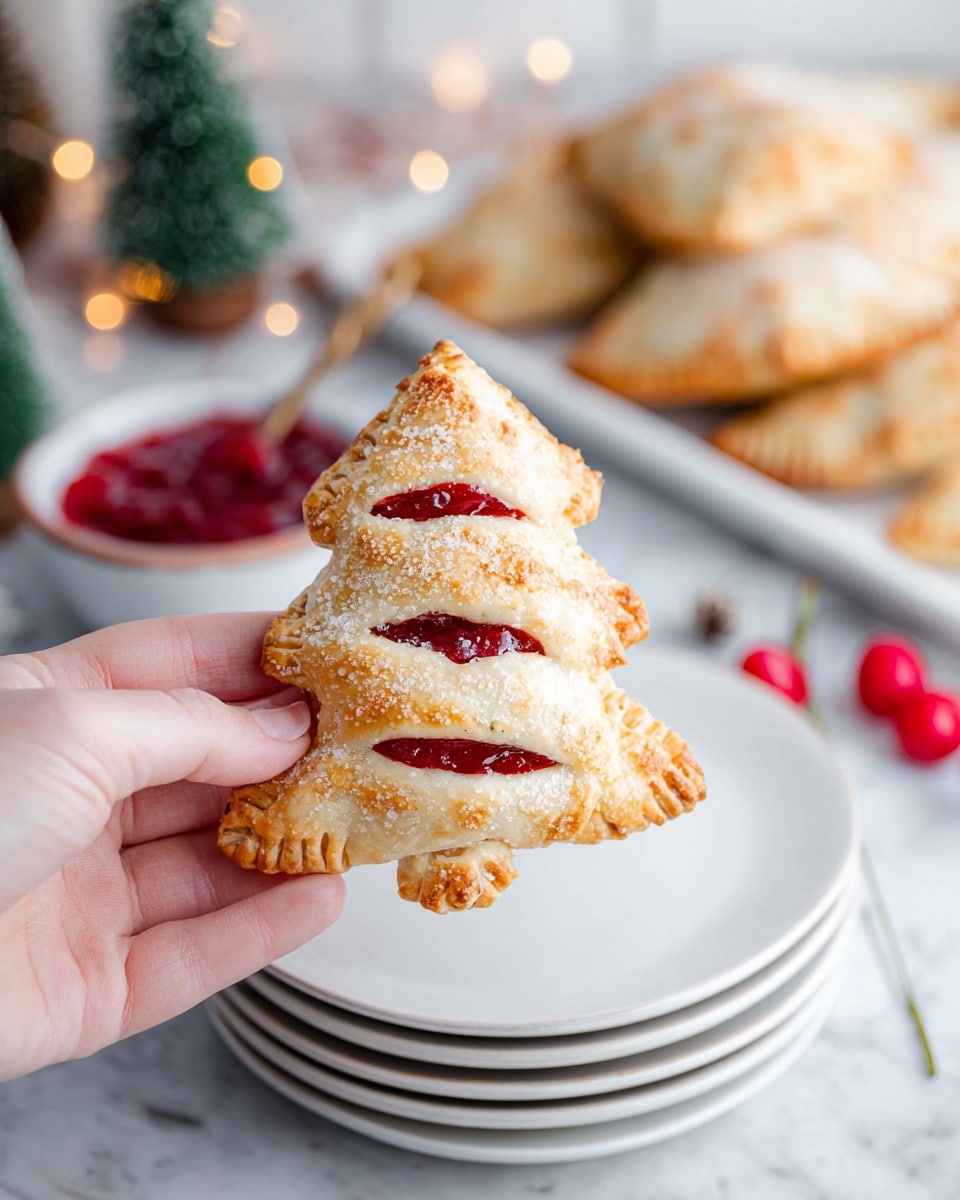
These Cherry Hand Pies are a delightful and festive treat, perfect for sharing during the holidays or any time you want a sweet, handheld dessert. Crispy golden crusts filled with luscious cherry pie filling make them irresistible. Plus, they’re easy to make with refrigerated pie crusts and simple ingredients.

Ingredients
- 3 boxes refrigerated pie crust (2 crusts each box)
- 1 can cherry pie filling (21 ounces)
- 2 large eggs
- 2 tablespoons water
- Coarse sanding sugar (optional)
Instructions
- Step 1: Preheat your oven to 350°F. Thaw the refrigerated pie crusts according to the package directions. Line a large cookie sheet with parchment paper and set aside.
- Step 2: In a small bowl, whisk together the eggs and water to create an egg wash. Set this mixture aside for later use.
- Step 3: Roll out one thawed pie crust using a rolling pin, ensuring there are no cracks or holes. The crust should be about 1/8 to 1/4 inch thick.
- Step 4: Use a 3-4 inch holiday tree cookie cutter to cut out about 7 tree shapes. Save the excess crust for later. Repeat this process with all the remaining pie crusts.
- Step 5: Gather all the leftover crust pieces, combine them, and roll out again to the same thickness to cut out any remaining hand pies.
- Step 6: Arrange half of the cut-out trees on the parchment-lined baking sheet. Spoon about 1 to 1 ½ tablespoons of cherry pie filling into the center of each tree. Brush the edges around the filling generously with egg wash.
- Step 7: Place the remaining tree shapes on top of the filling. Starting at the trunk, gently press the edges of the top and bottom crusts together, being careful not to press the filling down.
- Step 8: Press the seams firmly with the tines of a fork all around the edges to seal. Use a sharp knife to make a few slits on the top crust to allow steam to escape during baking.
- Step 9: Brush the top crusts with the remaining egg wash and sprinkle coarse sanding sugar over them if you like added sparkle and crunch.
- Step 10: Bake the pies for 20–25 minutes or until they are golden brown. Remove from the oven and transfer to a cooling rack. Enjoy warm or at room temperature.
Tips & Variations
- For a different fruit filling, try apple, blueberry, or peach pie filling instead of cherry.
- Chill the dough briefly before cutting to make handling easier and reduce sticking.
- If you don’t have a holiday tree cookie cutter, any small shape like circles or squares works well.
- Brush the pie edges with a little water before pressing to help create a stronger seal.
Storage
Store leftover hand pies in an airtight container at room temperature for up to 2 days. For longer storage, refrigerate for up to 5 days or freeze for up to 1 month. Reheat in a 350°F oven for about 10 minutes to crisp the crust and warm the filling before serving.
How to Serve
Serve this delicious recipe with your favorite sides.
FAQs
Can I use homemade pie crust instead of refrigerated?
Absolutely! Homemade pie crust works just as well and allows you to control ingredients and texture. Just roll it to about 1/8 to 1/4 inch thick before cutting out shapes.
How do I prevent the crust from getting soggy?
Don’t overfill the pies and be sure to seal the edges well with egg wash and fork presses. Making slits in the top crust also helps steam escape, keeping the crust flaky and crisp.
PrintCherry Hand Pies Recipe

Delightfully festive Cherry Hand Pies featuring flaky pie crusts filled with sweet cherry filling. Perfectly portioned and beautifully shaped using a holiday tree cookie cutter, these hand pies are an inviting treat for holiday gatherings or any time you crave a charming, handheld dessert.
- Prep Time: 20 minutes
- Cook Time: 25 minutes
- Total Time: 45 minutes
- Yield: Approximately 21 hand pies 1x
- Category: Dessert
- Method: Baking
- Cuisine: American
Ingredients
Pie Crust
- 3 boxes refrigerated pie crust (2 crusts per box)
Filling
- 1 can cherry pie filling (21 ounces)
Egg Wash
- 2 large eggs
- 2 tablespoons water
Optional
- Coarse sanding sugar, for sprinkling
Instructions
- Preheat and Prepare: Preheat your oven to 350 degrees F (175 degrees C) and thaw the refrigerated pie crusts according to the package instructions. Line a large cookie sheet with parchment paper and set aside.
- Make Egg Wash: In a small bowl, whisk together the eggs and water thoroughly to create the egg wash. Set this aside for later use.
- Roll Out Crusts: Take one thawed pie crust and gently roll it out with a rolling pin until it is evenly between 1/8 and 1/4 inch thick, taking care to avoid cracks or holes.
- Cut Shapes: Using a 3-4 inch holiday tree cookie cutter, cut out about 7 tree shapes from the rolled dough. Save the remaining dough scraps. Repeat the rolling and cutting process with all remaining pie crusts, collecting the scraps.
- Re-roll Scraps: Combine all the dough scraps and roll them out again to the same thickness to maximize dough usage and cut additional tree shapes for more hand pies.
- Assemble Hand Pies: Arrange the tree cutouts on the prepared baking sheet. Place 1 to 1 ½ tablespoons of cherry pie filling in the center of each tree-shaped bottom crust. Brush the edges around the filling with egg wash.
- Top and Seal: Carefully place another tree-shaped crust over the filling. Starting at the trunk of the tree, gently press the edges together to seal the pies, avoiding pressing down on the filling. Use the tines of a fork to crimp and seal the edges completely.
- Vent and Egg Wash: With a sharp knife, make a few small slits on the top crust of each pie to vent steam during baking. Brush the top crust generously with the remaining egg wash. Optionally, sprinkle with coarse sanding sugar for a sparkling finish.
- Bake: Bake the hand pies in the preheated oven for 20 to 25 minutes, or until they are golden brown and cooked through.
- Cool and Serve: Transfer the baked pies to a cooling rack. Serve warm or at room temperature for a delightful treat.
Notes
- Make sure to seal the edges well to prevent the cherry filling from leaking during baking.
- Using parchment paper on the baking sheet prevents sticking and makes cleanup easier.
- Adjust the amount of filling slightly if you prefer more or less in each pie, but avoid overfilling to prevent spills.
- These hand pies can be stored in an airtight container at room temperature for up to 2 days or refrigerated for longer freshness.
- Reheat gently in an oven to maintain crispness rather than microwaving.
Keywords: cherry hand pies, holiday hand pies, cherry dessert, pie crust recipe, handheld pies, festive dessert